
Note the setting up of automatic appointment emails will take a little time, so we recommend that you allow time to do the initial setup. You will need the following:
- To have previously set up Email within System Setup.
- The text you want to send to patients by email (note you can copy and paste from a program such as Microsoft Word).
- To have decided the appointment types that will be sent automated emails (for example Consultation, Treatment…). Also whether any of these appointment types will require different emails from the default Covid 19 one.
- Any attachments that you want to send with the email.

When you have this information, select Automated Emails. A message will be displayed summarising the steps that will be required to set up automated emails. Read the text and then click on Setup Wizard. A window will be displayed to help you set up the template that will be sent to patients automatically.
Edit the text as required. You can also enter the following by clicking on the buttons at the right:
- Set text colour
- Patient ID (the unique ID number for the patient on the patient regisration card)
- Patient Name (title, first name, surname)
- Clinic Name
- Appointment (date and time of next appointment)
- Practitioner (practitioner with whom the appointment is booked)
- Today (today’s date)

This will enter the field code for each of these. Note it is important to leave them exactly as they are with [] brackets, etc. When the email is sent it will replace these fields with the patient’s personal details. So an example of how these fields could be used is displayed.
Draft your text and fields and then click Next (note you will be able to edit later if required)
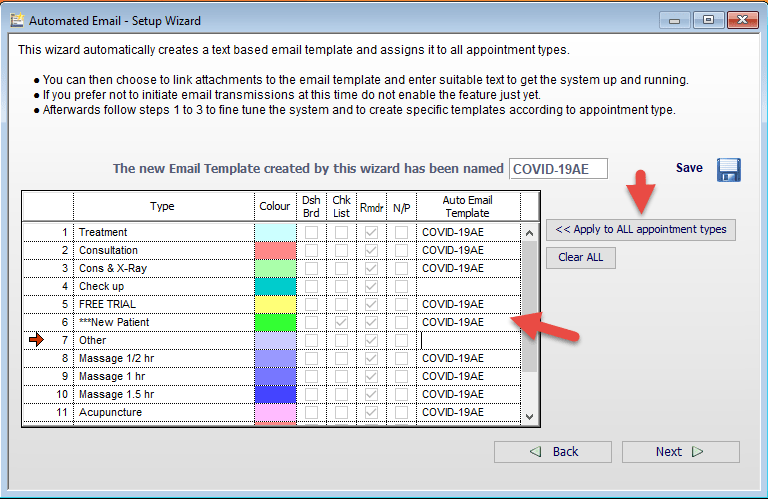
The appointment types at your clinic will be displayed. Select Apply to ALL appointment types (to apply it to all appointment types. The Auto Email Template created using the wizard. If you wish to use a different template for specific appointments you will need to enter their name within the Auto Email Template field as described later in these notes.

Click Next when you have completed this part of the setup (note you will be able to edit if required). The Automated Email – Setup Wizard will display the attachments window. To add an attachment click on the two dots beside the Attachments field. Browse to your attachments. Note we would recommend that you send an attachment in a format that most patients will be able to open – so for example as a pdf document not a Microsoft Word document.

IMPORTANT NOTE: Once you have selected this attachment, you should not move it (so, for example from Documents to another folder). Also, if you are planning to send emails from more than one computer then all need to be able to access the attachment location (so locate it on a shared drive, not a folder that only one computer can access).
Repeat as required.
Note that you can click the Back button if you wish to make any changes. Once you are happy with the automated email click on the Next button. Click Enable Automated Emails when you are happy that all of the settings are correct and then click Finished and confirm that you wish to save your changes.